![]()
Bring Life to Your Living Space
![]()
Bring Life to Your Living Space

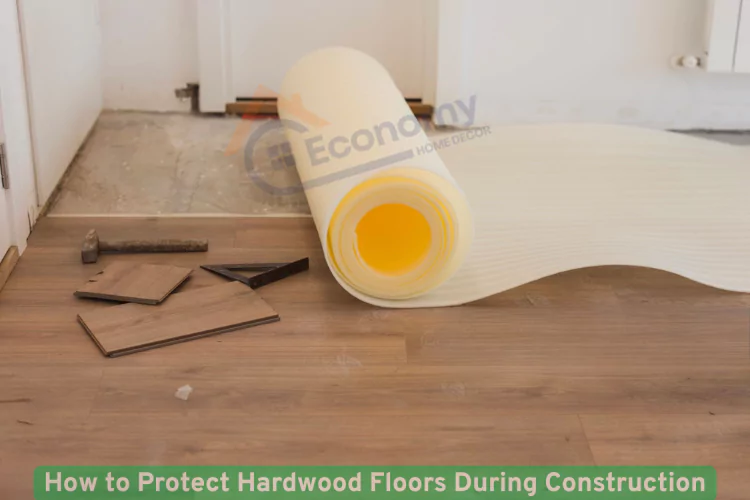
Construction projects can transform your home, but they can also wreak havoc on your beautiful hardwood floors. Whether you’re renovating a kitchen, adding a bathroom, or undertaking a whole-house remodel, knowing how to protect hardwood floors during construction is essential for preserving your investment and avoiding costly repairs.
Hardwood floors are particularly vulnerable during construction because they’re sensitive to moisture, scratches, dents, and chemical damage from various construction materials. The good news is that with proper planning and the right protective measures, you can keep your floors looking pristine throughout even the most extensive renovation projects.
Construction activities pose numerous threats to hardwood flooring that many homeowners don’t fully appreciate until it’s too late. Heavy foot traffic from workers wearing work boots can scratch and dent the surface, while dropped tools and materials can cause permanent damage that requires costly repairs or complete floor replacement.
Moisture is another significant concern when learning how to protect hardwood floors during construction. Plumbing work, painting, and even increased humidity from open doors and windows can cause wood to expand, contract, or warp. Additionally, construction dust can work its way into the wood grain and finish, creating a dull appearance that’s difficult to restore.
Chemical spills from adhesives, paints, solvents, and cleaning products can permanently stain or damage the wood finish. Even seemingly harmless materials like concrete dust or drywall compound can be abrasive and cause micro-scratches that accumulate over time, dulling the floor’s natural luster.
The financial impact of damaged hardwood floors can be substantial. Refinishing costs typically range from $3 to $8 per square foot, while complete replacement can cost $8 to $25 per square foot depending on the wood species and quality. Prevention is always more cost-effective than repair.
Before any construction work begins, conduct a thorough assessment of your hardwood floors to document their current condition. Take detailed photographs from multiple angles and note any existing scratches, dents, or stains. This documentation will be invaluable if you need to file insurance claims or hold contractors accountable for any damage that occurs during the project.
Proper planning is crucial for successfully implementing how to protect hardwood floors during construction strategies. Meet with your contractor to discuss specific protection requirements and ensure they understand the value and vulnerability of your flooring. Include floor protection clauses in your construction contract that clearly outline who’s responsible for protection measures and damage costs.
Consider the scope and duration of your project when planning protection strategies. Short-term projects might only require basic covering, while extensive renovations may need more robust protection systems. Factor in the types of work being performed – plumbing and electrical work pose different risks than painting or carpentry.
Create a timeline that includes floor protection installation and removal. Protection should be installed before any construction materials enter the space and remain in place until all work is completed and the area is thoroughly cleaned. Allow extra time in your schedule for proper installation and removal of protective materials.
Understanding the right materials is fundamental to mastering how to protect hardwood floors during construction. Ram board is considered the gold standard for construction floor protection. This temporary floor protection product is made from recycled paper and provides excellent protection against moisture, scratches, and impact damage. It’s available in various thicknesses, with heavier grades offering more protection for high-traffic areas.
Rosin paper, also called builder’s paper, is a traditional and cost-effective option for basic protection. While not as durable as ram board, it provides adequate protection for lighter construction activities. However, it’s not waterproof and can tear easily under heavy use, so it’s best suited for short-term projects with minimal foot traffic.
Plastic sheeting offers excellent moisture protection but can be slippery and doesn’t provide cushioning against impact damage. When used alone, it’s not ideal for areas with heavy foot traffic. However, it can be effectively combined with other materials for comprehensive protection.
Carpet protection film is a self-adhesive plastic film that’s easy to apply and remove. While primarily designed for carpets, it can provide temporary protection for hardwood floors during light construction activities. However, be cautious about adhesive residue, especially on floors with delicate finishes.
Proper installation is critical when implementing how to protect hardwood floors during construction. Begin by thoroughly cleaning the hardwood floors to remove all dirt, dust, and debris. Any particles left on the surface can become trapped under the protective covering and cause scratches when walked on.
Start installation at one end of the room and work systematically toward the exit to avoid walking on freshly installed protection. When using ram board or rosin paper, overlap seams by at least 6 inches and secure with high-quality tape designed for temporary applications. Avoid using duct tape directly on hardwood floors, as it can leave adhesive residue or damage the finish when removed.
For areas with high foot traffic or heavy equipment, consider double-layering your protection. Install a base layer of rosin paper followed by ram board on top. This combination provides both moisture protection and impact resistance while remaining cost-effective for larger areas.
Pay special attention to doorways and transition areas where protection materials are most likely to shift or tear. Use additional tape and consider installing threshold strips to prevent tripping hazards and maintain protection integrity throughout the construction period.
Different hardwood finishes require specific considerations when determining how to protect hardwood floors during construction. Oil-based polyurethane finishes are generally more durable and chemical-resistant, making them somewhat easier to protect. However, they can still be damaged by heavy impact or prolonged moisture exposure.
Water-based polyurethane finishes, while environmentally friendly and quick-drying, tend to be more sensitive to chemicals and moisture. These floors require extra attention to moisture barriers and should never be exposed to standing water or high humidity conditions during construction.
Wax finishes are particularly vulnerable and require the most careful protection. These traditional finishes can be damaged by heat, moisture, and many common construction chemicals. Consider using breathable protection materials that won’t trap moisture against the surface, which could cause white spots or cloudiness in wax finishes.
Engineered hardwood floors have different protection requirements than solid hardwood. While the top layer is real wood and needs the same scratch and dent protection, the plywood or HDF core can be more susceptible to moisture damage. Ensure complete moisture barriers when protecting engineered flooring during construction projects.
Moisture control is a critical aspect of how to protect hardwood floors during construction. Wood is hygroscopic, meaning it naturally absorbs and releases moisture from the surrounding environment. Construction activities often introduce additional moisture through wet trades like plumbing, concrete work, and painting.
Maintain consistent temperature and humidity levels throughout the construction period whenever possible. Ideal conditions for hardwood floors are 60-80°F with 30-50% relative humidity. Use dehumidifiers in humid conditions and humidifiers in very dry conditions to minimize wood movement and prevent gaps or cupping.
Monitor weather conditions and adjust protection strategies accordingly. During rainy periods, ensure all windows and doors are properly sealed, and consider additional moisture barriers. Be particularly vigilant about tracking mud and water into the work area, as even small amounts of moisture can cause problems if trapped under protective coverings.
Install vapor barriers under protective materials in areas where wet work is being performed. Plastic sheeting can serve this purpose, but ensure it’s properly taped and sealed to prevent moisture from reaching the wood. However, avoid creating completely sealed environments that could trap condensation and cause more problems than they solve.
Controlling foot traffic is essential when implementing how to protect hardwood floors during construction. Establish designated walkways using durable protection materials like ram board or plywood for areas that will see heavy or frequent use. These pathways should be clearly marked and maintained throughout the construction period.
Implement a shoe policy for all workers and visitors entering areas with protected hardwood floors. Consider requiring shoe covers or clean work boots only. Some contractors prefer to have workers remove shoes entirely in certain areas, though this may not be practical for all types of construction work.
Create staging areas for tools and materials away from protected flooring whenever possible. When materials must be stored on protected floors, use additional padding or protective layers to distribute weight and prevent point loads that could cause dents or damage through the protective covering.
Establish clear protocols for moving heavy equipment or materials across protected floors. Use dollies with soft wheels, and consider laying down additional plywood or ram board for temporary heavy-load areas. Plan material deliveries and removal to minimize the time heavy items spend on protected flooring.
Heavy equipment poses special challenges when learning how to protect hardwood floors during construction. Piano boards or heavy-duty plywood can distribute the weight of heavy tools and equipment over a larger area, reducing the risk of dents and damage. For extremely heavy items, consider renting specialized floor protection systems designed for construction use.
Pneumatic tools and compressors should be placed on protective mats or boards to prevent vibration damage and oil leaks. Air hoses can cause scratches if dragged across floors, so use hose protectors or elevated guides to keep them off the surface.
Power tools with sharp edges or protruding parts require special attention. Tool bags and cases should have soft bottoms to prevent scratches when set down. Consider using foam padding or moving blankets under tool storage areas for additional protection.
Ladders and scaffolding feet should always have protective pads or be placed on boards to distribute weight and prevent dents. Check ladder feet regularly for embedded debris that could scratch floors, and clean them before each use. For scaffolding, use base plates or boards under all support points.
Chemical protection is a crucial component of how to protect hardwood floors during construction. Many construction materials contain chemicals that can permanently stain or damage hardwood finishes. Alkaline materials like concrete, mortar, and some cleaning products are particularly harmful to wood finishes and can cause permanent discoloration.
Paint and primer spills are among the most common and problematic chemical threats during construction. Use canvas drop cloths or plastic sheeting specifically designed for paint protection. Avoid using newspapers or thin plastic that can tear easily and provide inadequate protection.
Solvents, adhesives, and cleaning products should be stored and used with extreme caution around hardwood floors. Even vapors from these products can sometimes affect certain finishes. Ensure adequate ventilation and never allow these materials to come into direct contact with the floor, even through protective coverings.
Develop spill response procedures before construction begins. Have cleanup materials readily available, and ensure all workers know how to respond immediately to chemical spills. Quick action can often prevent permanent damage, while delayed cleanup almost always results in costly repairs.
Dust control is an often-overlooked aspect of how to protect hardwood floors during construction. Construction dust can be surprisingly abrasive and can work its way through inadequate protection to scratch floor finishes. Fine dust particles can also become embedded in wood grain and are extremely difficult to remove completely.
Install dust barriers at room entrances and use negative air pressure when possible to keep dust from settling on floors. Even with protective coverings, minimizing the amount of dust in the environment will help preserve floor quality and make final cleanup easier.
Regular cleaning of protective coverings is essential. Dust and debris that accumulate on protection materials can be ground into floors when walked on. Use soft-bristled brooms or vacuum cleaners with brush attachments to clean protection materials regularly without damaging them.
Plan dust-generating activities for times when floors can be most thoroughly protected and cleaned. For example, sanding or demolition work should be done when the strongest protection is in place, and areas should be thoroughly cleaned before workers continue with other tasks.
Proper cleanup and inspection are the final steps in how to protect hardwood floors during construction. Remove protective materials carefully to avoid scratching floors during the removal process. Start at one end and work systematically, checking for any damage as you go.
Thoroughly clean floors after removing protection, but use only products recommended for your specific floor finish. Avoid harsh chemicals or abrasive cleaning tools that could damage the finish you worked so hard to protect. A slightly damp mop with appropriate hardwood floor cleaner is usually sufficient.
Inspect floors carefully in good lighting conditions, preferably natural daylight. Look for scratches, dents, stains, or changes in sheen that might indicate damage. Document any issues with photographs and report them immediately to your contractor if damage occurred during construction.
Consider professional cleaning or maintenance after major construction projects. Even with excellent protection, floors may benefit from professional deep cleaning or light refinishing to restore their original luster. Professional assessment can also identify any subtle damage that might not be immediately visible but could worsen over time.
Understanding the economics reinforces why learning how to protect hardwood floors during construction is so important. Quality floor protection materials typically cost $0.50 to $2.00 per square foot, depending on the type and level of protection needed. Labor for installation and removal adds another $0.25 to $1.00 per square foot.
Compare these protection costs to potential repair expenses: spot repairs for minor damage typically cost $100-300 per damaged area, while refinishing an entire room can cost $3-8 per square foot. Complete floor replacement ranges from $8-25 per square foot for quality hardwood flooring, making protection costs seem minimal by comparison.
Factor in indirect costs like project delays and the inconvenience of living with damaged floors. Protection allows construction to proceed smoothly without stopping to address floor damage, potentially saving time and reducing overall project costs.
Insurance considerations are also important. Many homeowner’s policies don’t cover damage from construction activities, and contractor insurance may have exclusions for pre-existing surfaces. Proper protection documentation can be valuable if insurance claims become necessary.
Several common mistakes can undermine even well-intentioned efforts at how to protect hardwood floors during construction. Using inadequate materials is perhaps the most frequent error. Thin plastic sheeting, newspapers, or cardboard provide minimal protection and can actually cause problems by trapping moisture or tearing under foot traffic.
Improper installation of protection materials is another major issue. Loose or poorly secured coverings can shift, bunch up, or develop tears that expose floors to damage. Taking time to properly install and maintain protection throughout the project is essential for success.
Failing to address specific risks for your particular project is also problematic. A kitchen renovation involving plumbing work requires different protection strategies than a bedroom painting project. Tailor your protection approach to the specific activities and risks involved in your construction project.
Removing protection too early is a mistake that negates all previous protective efforts. Keep protection in place until all construction activities are completely finished, including final cleanup. Even seemingly harmless activities like final touch-up painting can cause damage to unprotected floors.
Deciding between professional and DIY approaches to how to protect hardwood floors during construction depends on several factors including project scope, budget, and personal comfort level. Professional protection services typically cost more upfront but provide expertise, proper materials, and often include damage guarantees.
DIY protection can be cost-effective for smaller projects and homeowners who are comfortable with installation procedures. However, it requires investment in proper materials and tools, plus the time to install and maintain protection throughout the construction period.
Consider professional services for large projects, valuable or antique floors, or when working with contractors who aren’t experienced with hardwood floor protection. The expertise and insurance coverage provided by professionals can provide peace of mind and potentially save money if problems occur.
For DIY approaches, invest in quality materials and take time to properly educate yourself about installation procedures. Don’t compromise on protection quality to save a few dollars – the potential cost of floor damage far exceeds the cost of proper protection materials.
Quality materials like ram board can typically remain in place for several months without issues. However, inspect regularly and replace any damaged sections to maintain protection effectiveness.
Basic plastic sheeting provides moisture protection but lacks cushioning for impact protection and can be slippery. It’s better used in combination with other materials rather than alone.
Remove wet materials immediately and allow floors to dry completely before installing new protection. Trapped moisture can cause serious damage to hardwood floors.
Yes, paint spills can permanently damage hardwood finishes. Use canvas drop cloths or specialized paint protection materials even for seemingly simple painting projects.
Conduct thorough inspections in good lighting before and after construction. Look for new scratches, dents, stains, or changes in surface sheen. Document everything with photographs.
| Material Type | Cost per sq ft | Moisture Protection | Impact Protection | Durability | Best Use |
|---|---|---|---|---|---|
| Ram Board | $0.75-$1.50 | Excellent | Excellent | High | Heavy construction |
| Rosin Paper | $0.25-$0.50 | Good | Fair | Medium | Light work |
| Plastic Sheeting | $0.15-$0.30 | Excellent | Poor | Low | Moisture barrier |
| Carpet Film | $0.40-$0.80 | Fair | Poor | Medium | Temporary protection |
| Canvas Drop Cloth | $0.60-$1.20 | Poor | Good | High | Paint protection |
Understanding how to protect hardwood floors during construction is an investment in preserving your home’s value and beauty. With proper planning, materials, and execution, you can complete even extensive renovation projects while keeping your hardwood floors in pristine condition. The key is treating floor protection as an essential part of your construction project, not an optional afterthought.