![]()
Bring Life to Your Living Space
![]()
Bring Life to Your Living Space

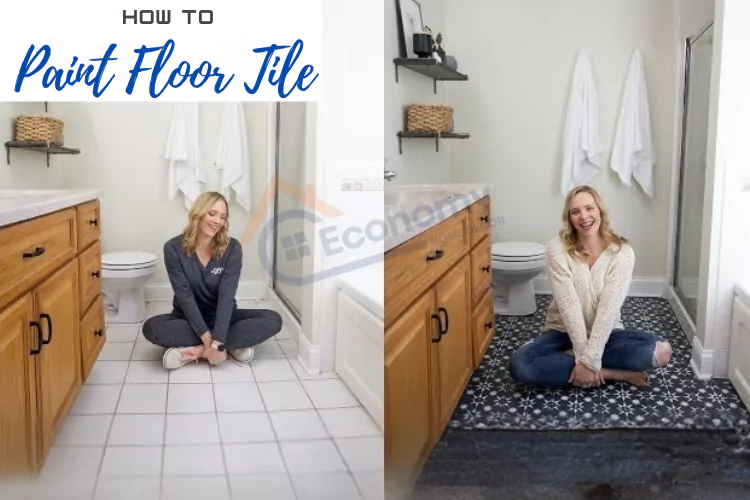
Transforming your bathroom doesn’t have to break the bank. Learning how to paint floor tile in bathroom spaces can give you a stunning makeover for a fraction of the cost of replacement. This comprehensive guide will walk you through every step of the process, from preparation to final touches, ensuring you achieve professional-looking results that last.
Painting bathroom floor tiles offers numerous advantages for homeowners looking to refresh their space without major renovations. Cost-effectiveness stands as the primary benefit, as tile painting costs significantly less than tile replacement. A typical tile replacement project can cost thousands of dollars, while painting tiles might only require a few hundred dollars in materials.
Beyond financial savings, painting tiles provides unlimited design flexibility. You can choose from countless color options, create patterns, or even achieve faux finishes that weren’t possible with your original tiles. This approach also allows you to update your bathroom’s aesthetic to match current trends or your personal style preferences.
The process is also environmentally friendly, as it prevents old tiles from ending up in landfills. Additionally, painted tiles can last for years when properly prepared and maintained, making this a sustainable home improvement option that delivers long-term value.
Before starting your tile painting project, gather these essential tools:
The success of your tile painting project depends heavily on using the right materials:
Professional tip: Invest in quality materials rather than cutting corners. The difference in durability and appearance is significant, and quality products often provide better coverage, reducing the number of coats needed.
Proper preparation is crucial when learning how to paint floor tile in bathroom areas effectively. Begin by removing all bathroom fixtures, rugs, and accessories. This includes toilet seats, bath mats, and any decorative items that could interfere with your work or become damaged during the painting process.
Next, protect your bathroom fixtures and walls. Use high-quality painter’s tape to mask off baseboards, toilet bases, bathtub edges, and any other areas you don’t want painted. Cover these surfaces with plastic sheeting or drop cloths to prevent accidental paint splatters.
Ventilation is critical during this project. Open windows if possible, and use fans to circulate air. If your bathroom doesn’t have adequate natural ventilation, consider using a portable fan or postponing the project until you can ensure proper airflow.
Examine your tiles carefully for any damage, loose pieces, or significant wear. Small chips or scratches can often be filled with appropriate filler before painting, but severely damaged tiles may need replacement before proceeding. Check that all tiles are firmly attached to the substrate, as loose tiles will cause paint failure.
Address any existing issues with grout lines, as these can affect the overall appearance of your finished project. Clean out any loose or damaged grout, and consider whether you’ll need to regrout certain areas before painting.
The foundation of successful tile painting lies in thorough cleaning. Bathroom tiles accumulate soap scum, mineral deposits, and other residues that can prevent proper paint adhesion. Start with a commercial degreasing cleaner specifically designed for bathroom surfaces, applying it generously and allowing it to sit for the recommended time.
For stubborn buildup, create a paste using baking soda and water, or use a mixture of white vinegar and dish soap. Apply these solutions with a scrub brush, paying particular attention to corners and edges where buildup tends to accumulate most heavily.
Don’t overlook the grout lines during cleaning, as dirt and mildew in these areas can bleed through your paint job. Use an old toothbrush or specialized grout brush to thoroughly clean between tiles.
After removing all visible dirt and buildup, rinse the entire floor thoroughly with clean water. Follow this with a final cleaning using trisodium phosphate (TSP) or a TSP substitute, which will remove any remaining residue and ensure optimal paint adhesion.
Allow the floor to dry completely before proceeding. This may take 24-48 hours in humid conditions, so plan accordingly. Using fans or a dehumidifier can speed up the drying process, but don’t rush this crucial step.
Learning how to paint floor tile in bathroom spaces successfully requires understanding the importance of proper surface preparation. Most bathroom tiles have a glossy finish that resists paint adhesion. Light sanding with 220-grit sandpaper creates the surface texture necessary for primer and paint to bond properly.
Sand the entire tile surface using circular motions, being careful not to gouge the tile. The goal isn’t to remove the tile’s finish completely, but rather to create a slightly rough surface that primer can grip. Pay attention to edges and corners, as these areas are often missed but are crucial for a professional appearance.
After sanding, vacuum up all dust and debris, then wipe the surface with a tack cloth or microfiber cloth to remove any remaining particles. Even small amounts of dust can create imperfections in your final paint job.
For homeowners who prefer not to sand, chemical etching provides an alternative method for preparing glossy tile surfaces. Etching solutions create microscopic roughness that allows primer to adhere properly without the physical labor of sanding.
Apply the etching solution according to manufacturer instructions, typically using a brush or sponge to ensure even coverage. Allow the solution to work for the specified time, then neutralize and rinse thoroughly. This method works particularly well on ceramic and porcelain tiles.
Safety note: Always wear protective equipment when using chemical etching solutions, including gloves, eye protection, and ensure adequate ventilation.
Selecting the appropriate primer is crucial for long-lasting results when painting bathroom floor tiles. Bonding primers are specifically designed for non-porous surfaces like ceramic and porcelain tiles. These primers contain special adhesion promoters that help paint stick to glossy surfaces.
Epoxy-based primers offer superior durability and moisture resistance, making them ideal for high-humidity bathroom environments. While they may cost more initially, their superior performance often justifies the investment, especially in frequently used bathrooms.
For natural stone tiles, use primers specifically formulated for porous surfaces. These primers penetrate the stone and create a stable foundation for your topcoat.
Apply primer using a high-quality synthetic brush or roller designed for smooth surfaces. Work in small sections to maintain a wet edge and avoid lap marks. Most tile primers require only one coat, but check manufacturer recommendations for your specific product.
Pay special attention to grout lines, as these areas can be challenging to coat evenly. Use a smaller brush to ensure complete coverage in these narrow spaces. Allow the primer to cure completely before applying paint – this typically takes 2-4 hours, depending on temperature and humidity.
When mastering how to paint floor tile in bathroom projects, epoxy paints represent the gold standard for durability and longevity. These two-part paints create an extremely hard, chemical-resistant surface that can withstand the moisture and foot traffic typical in bathroom environments.
Water-based epoxy paints offer easier cleanup and lower odor while still providing excellent durability. They’re particularly suitable for DIY projects as they’re more forgiving during application and have longer working times than solvent-based alternatives.
Oil-based epoxy paints provide superior durability and chemical resistance but require more careful application and ventilation. They also have longer cure times, which may extend your project timeline.
High-quality acrylic paints formulated for bathroom use can provide good results at a lower cost than epoxy options. Look for paints specifically labeled for high-moisture areas and that include mildew resistance.
Acrylic-urethane paints combine the ease of application of acrylics with enhanced durability approaching that of epoxy paints. These paints offer good compromise between performance and ease of use for DIY projects.
Begin painting your prepared tiles by cutting in edges and corners with a high-quality angled brush. This ensures clean lines and complete coverage in areas where rollers can’t reach effectively. Work systematically across the floor, maintaining organization to avoid missing sections.
Apply the first coat using a high-density foam roller or mohair roller designed for smooth surfaces. Roll in one direction initially, then cross-roll perpendicular to your first pass for even coverage. Don’t overwork the paint, excessive rolling can create texture issues and reduce the smoothness of your finish.
Allow the first coat to dry completely according to manufacturer specifications. This may take 4-6 hours for most tile paints, but can vary based on temperature, humidity, and paint type. Resist the urge to apply the second coat too early, as this can cause adhesion problems.
The second coat is crucial for achieving full coverage and durability. Examine the first coat carefully under good lighting to identify any thin spots or areas that need additional attention. These areas should receive extra attention during the second coat application.
Apply the second coat using the same techniques as the first, but pay particular attention to maintaining a consistent thickness. Thin, even coats provide better results than attempting to achieve full coverage in a single heavy application.
After mastering the basics of how to paint floor tile in bathroom surfaces, protecting your investment with appropriate sealant becomes essential. Polyurethane sealants offer excellent protection against moisture, scratches, and everyday wear. Choose water-based polyurethane for easier application and cleanup, or oil-based versions for maximum durability.
Penetrating sealers work by soaking into the paint rather than forming a surface film. These sealers maintain the painted surface’s appearance while providing protection from within. They’re particularly good for textured or slip-resistant finishes.
Apply sealant only after the paint has cured completely – typically 24-48 hours after the final paint coat. Use a clean roller or brush specifically designated for sealant application, as any paint residue can contaminate the sealant and affect its performance.
Work in small sections, maintaining a wet edge to prevent lap marks. Most sealants require two coats for optimal protection, with light sanding between coats using fine-grit sandpaper (400-grit or finer).
The most common mistake when learning how to paint floor tile in bathroom areas is rushing through preparation steps. Inadequate cleaning leaves residues that prevent proper adhesion, while skipping primer or using incorrect primer types leads to premature paint failure.
Insufficient drying time between coats is another frequent error. Each coat must cure completely before applying the next, or you risk creating a weak bond that will fail under normal use.
Painting in high humidity or extreme temperatures can significantly affect your results. Most tile paints perform best when applied in temperatures between 65-75°F with relative humidity below 50%. Using fans or dehumidifiers can help create optimal conditions.
Poor ventilation not only affects paint performance but can also create health hazards. Always ensure adequate air circulation throughout the project, especially when using epoxy or oil-based products.
Maintaining painted bathroom floor tiles requires consistent but simple care practices. Daily cleaning with mild, pH-neutral cleaners helps prevent buildup that can damage the paint over time. Avoid abrasive cleaners or scrubbing pads that can scratch the painted surface.
Immediate cleanup of spills prevents staining and reduces the likelihood of moisture penetration at joints or damaged areas. Use soft microfiber cloths or mops for routine cleaning, and avoid excessive water that can seep into grout lines or small paint imperfections.
Inspect your painted tiles regularly for signs of wear or damage. Small chips or scratches can be touched up easily if addressed promptly, but neglecting minor damage can lead to more extensive repairs later.
Resealing annually or as needed helps maintain the protective barrier that keeps your painted tiles looking their best. This simple maintenance step significantly extends the life of your paint job and maintains its appearance.
If you notice paint peeling or flaking, the issue typically stems from inadequate surface preparation or contamination. Address these problems by removing loose paint, recleaning the affected area, and reapplying primer before touching up with paint.
Bubbling or blistering often indicates moisture problems beneath the paint. This may require more extensive repair, including checking for leaks and ensuring proper ventilation before repainting.
Uneven color or coverage problems usually result from inconsistent application techniques or using too few coats. Light spots can often be corrected with additional coats, while heavy areas may require sanding smooth before recoating.
Brush marks or roller texture can be minimized by using appropriate tools and techniques. High-quality brushes and rollers designed for smooth surfaces help achieve professional-looking results.
| Item Category | Budget Range | Premium Range | Notes |
|---|---|---|---|
| Primer | $25-40 | $50-75 | Coverage varies by brand |
| Paint | $40-80 | $100-150 | Epoxy costs more but lasts longer |
| Sealant | $30-50 | $75-100 | Essential for durability |
| Tools | $50-100 | $150-250 | Quality tools improve results |
| Cleaning Supplies | $20-35 | $40-60 | Don’t skimp on preparation |
| Total Project Cost | $165-305 | $415-635 | Compare to $2000+ for tile replacement |
Understanding the costs involved in learning how to paint floor tile in bathroom projects helps you budget appropriately and make informed decisions about material quality. While premium materials cost more initially, they often provide better coverage, durability, and overall value.
Consider the cost per square foot when comparing painting to tile replacement. Most bathroom painting projects cost $2-8 per square foot, while tile replacement typically costs $10-25 per square foot including materials and labor.
While many homeowners can successfully complete basic tile painting projects, certain situations may warrant professional assistance. Bathrooms with complex layouts, multiple levels, or intricate tile patterns may benefit from professional expertise to ensure even coverage and proper technique.
Large bathrooms or those with accessibility challenges might also be better suited for professional completion, especially if you have limited time or physical constraints that make the project difficult to complete properly.
If you’re preparing your home for sale or have particularly high standards for finish quality, hiring professionals may provide better results and peace of mind. Professional painters have experience with various tile types and can often complete projects faster with superior results.
Warranty considerations also favor professional work, as many professional painters offer guarantees on their work that can provide additional protection for your investment.
Learning how to paint floor tile in bathroom spaces successfully requires attention to detail, quality materials, and proper techniques. Here are the essential points to remember:
The most important factor in achieving professional results is patience. Rushing through any step of the process can compromise the entire project, while taking time to do each step properly ensures years of satisfaction with your transformed bathroom.
When properly prepared and maintained, painted bathroom floor tiles can last 3-7 years or more, depending on traffic levels and maintenance quality.
Yes, but you’ll need to assess the condition of the existing paint, clean thoroughly, and may need to sand or use a bonding primer for best results.
Yes, with proper ventilation and safety equipment. Always wear protective gear and ensure adequate air circulation, especially with epoxy or oil-based products.
Spring or fall typically offer optimal conditions with moderate temperatures and humidity levels. Avoid painting during very humid or cold weather.
Wait at least 24-48 hours before light use, and avoid heavy traffic for up to a week to allow complete curing.
Yes, but natural stone requires specific primers and paints designed for porous surfaces. Test in an inconspicuous area first.
Mastering how to paint floor tile in bathroom spaces opens up exciting possibilities for affordable bathroom transformations. This comprehensive approach allows you to achieve stunning results that rival expensive renovations while staying within a reasonable budget. The key to success lies in meticulous preparation, using quality materials, and following proper application techniques.
Remember that patience and attention to detail during each phase of the project will reward you with durable, beautiful results that enhance your bathroom’s appearance and your home’s value. With the right approach and materials, your painted bathroom floor tiles can provide years of satisfaction and serve as a testament to your DIY skills.
Take pride in your accomplishment – transforming your bathroom through tile painting represents both creative expression and practical home improvement. The skills you’ve developed through this project will serve you well in future home improvement endeavors, and the money saved can be invested in other areas of your home or personal priorities.