![]()
Bring Life to Your Living Space
![]()
Bring Life to Your Living Space

Transforming your garage into a functional workshop isn’t just about throwing tools into a corner and hoping for the best. A well-planned garage workshop layout can triple your productivity, prevent accidents, and turn a cluttered space into a craftsman’s dream. Whether you’re a weekend woodworker, automotive enthusiast, or DIY hobbyist, the right layout makes every project smoother and more enjoyable.
Poor workshop planning leads to wasted time searching for tools, inefficient workflows, and even safety hazards. This comprehensive guide walks you through proven garage workshop layout ideas, smart organization strategies, and practical upgrades that maximize every square foot of your space.
Before sketching your layout, identify your workshop’s primary purpose. Different activities require different setups.
Woodworking shops need ample bench space, dust collection systems, and dedicated areas for table saws, miter saws, and lumber storage. Plan for minimum clearance of 36 inches around major machinery for safe operation and material handling.
Car enthusiasts require floor space for vehicle access, heavy-duty tool storage, parts organization, and proper ventilation for fumes. Consider floor-mounted lifts or jack points, and ensure electrical outlets are positioned for air compressors and power tools.
Metal shops demand fireproof surfaces, robust machinery moving capabilities for heavy equipment, excellent ventilation, and dedicated welding stations. Fire extinguishers and proper eye protection storage are non-negotiable.
Most home workshops serve multiple functions. These flexible spaces benefit from modular storage, mobile workbenches, and adaptable tool organization that adjusts to different project types.
Working with 12×20 feet or less? Vertical storage becomes your best friend. Mount a sturdy workbench along one wall, install ceiling-mounted storage for seasonal items, and use fold-down tables that create workspace when needed and disappear when finished.
Key strategies for small spaces:
A 20×20 foot garage offers room for dedicated zones. Position your primary workbench along the back wall, install tool storage on side walls, and maintain a clear center pathway for material movement and vehicle parking if needed.
The L-shaped layout works exceptionally well here place your workbench and primary tools along two adjacent walls, creating an efficient work triangle that minimizes unnecessary movement.
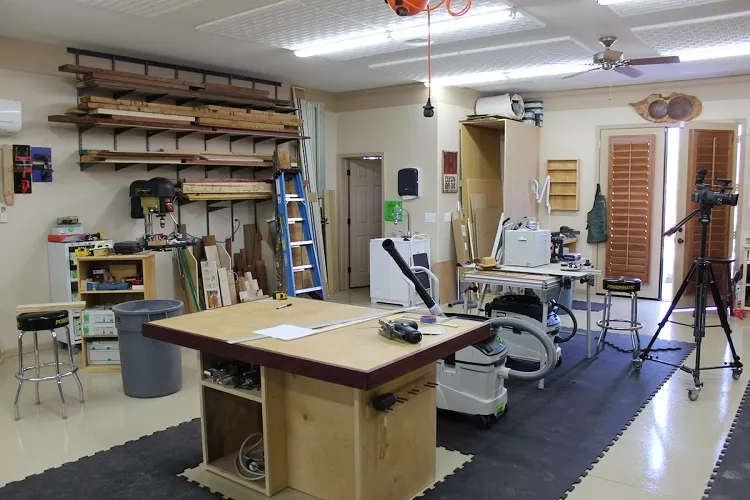
Spacious workshops (24×24 feet or larger) accommodate island workbenches, multiple work zones, and substantial machinery. Create distinct areas for different activities while maintaining logical workflow patterns.
Consider the U-shaped configuration: workbench and assembly area on one wall, power tools and machinery on another, and storage/finishing area on the third wall. This garage workshop plan keeps everything within a few steps while providing ample workspace.
Every functional workshop contains these critical zones, regardless of size.
Your workbench serves as mission control. Position it under good lighting with power outlets within arm’s reach. A 6-8 foot workbench provides adequate space for most projects. Install a vise at one corner and keep frequently used hand tools within easy reach using pegboards or tool rails.
Separate active storage (tools you use weekly) from archive storage (seasonal or specialty equipment). Place frequently accessed items between knee and eye level. Reserve lower cabinets for heavy items and overhead storage for lightweight, occasional-use materials.
Larger equipment needs dedicated floor space with proper clearances. Table saws require 8-10 feet of infeed and outfeed space. Drill presses, grinders, and sanders benefit from wall-mounted positions that keep them accessible but out of main traffic flows.
For safe and efficient transportation of heavy machinery, ensure you have clear pathways and proper equipment moving techniques to avoid injuries during workshop reorganization.
Position fire extinguishers near exits and potential fire hazards. Install smoke detectors and carbon monoxide detectors. If working with chemicals, paints, or generating dust, ensure adequate ventilation with exhaust fans or open windows. Keep a first aid kit in an obvious, accessible location.
Effective organization transforms chaos into calm productivity.
Pegboards offer infinite customization. Outline each tool with paint or tape so you immediately notice missing items. Standard pegboard costs $15-30 for a 4×8 sheet and accepts hundreds of hook configurations.
Slat wall systems provide cleaner aesthetics and stronger weight capacity than pegboard, perfect for heavier tools and equipment.
Ceiling-mounted racks utilize wasted vertical space for lumber, seasonal items, and rarely used equipment. Install these above head height (minimum 7 feet clearance) to maintain safe movement below.
Rolling carts bring tools to your project rather than hauling materials to fixed locations. Look for locking wheels, multiple shelf heights, and power strip integration for maximum versatility.
Adjustable metal shelving adapts as your needs change. Industrial-grade units support 200-300 pounds per shelf and cost $80-150 for 6-foot units. Label every shelf and bin for instant identification.
Strategic upgrades dramatically improve workshop functionality and comfort.
Poor lighting causes eye strain and imprecise work. Replace standard bulbs with LED shop lights providing 4000-5000 lumens. Install task lighting directly above your workbench and machinery. Consider motion-activated lights near entrances for hands-free convenience.
Recommended setup: Overhead LED strips (5000K color temperature) for general illumination plus adjustable task lights at work surfaces.
Bare concrete floors are hard on feet and joints during long projects. Interlocking rubber tiles, epoxy coatings, or industrial-grade vinyl provide cushioning, easier cleanup, and professional appearance.
Epoxy flooring ($3-12 per square foot installed) resists chemicals, oil, and impacts while brightening the space with reflective finishes.
Most garages have insufficient outlets poorly positioned for workshop use. Add 20-amp circuits with outlets every 4-6 feet along work walls. Install dedicated 240V circuits for air compressors, welders, or large machinery.
Consider USB-integrated outlets for charging batteries and devices at your workbench.
Insulated garage doors, wall insulation, and climate control extend comfortable working seasons. Radiant heaters warm workshops quickly without blowing dust. Portable air conditioners or ceiling fans make summer projects bearable.
Even basic insulation (R-13 in walls, R-30 in ceiling) dramatically reduces heating and cooling costs.
Tools scattered randomly create inefficient movement patterns. Think through your typical project sequence: lumber storage → cutting → assembly → finishing. Arrange zones to match this natural flow.
That bargain tool chest seems great until you can’t walk past your table saw. Maintain minimum 36-inch pathways for safe movement and material handling. Less clutter equals better safety and productivity.
Saving money on proper dust collection or ventilation costs more in health problems later. Budget for basic safety equipment: eye protection storage, hearing protection, dust masks, and proper ventilation fans.
Step 1: Measure Your Space Record exact dimensions including door openings, windows, electrical panel location, and ceiling height. Note obstacles like support posts, water heaters, or HVAC equipment.
Step 2: Define Your Workshop Purpose List your three most common project types. This determines whether you need more bench space, floor area, or specialized tool storage.
Step 3: Choose the Right Layout Sketch your floor plan on graph paper (1 square = 1 foot). Draw fixed elements first, then position major equipment, workbench, and storage areas.
Step 4: Organize Tools Efficiently Group tools by function and frequency of use. Install storage systems before moving equipment in retrofitting around clutter is frustrating and inefficient.
Step 5: Test and Adjust Live with your initial layout for a few weeks. Notice what works smoothly and what creates bottlenecks. Adjust before permanently installing expensive systems.
A well-planned garage workshop layout elevates every project from frustrating to fulfilling. Whether working with a compact one-car garage or spacious detached workshop, applying these garage workshop organization ideas creates efficient, safe, and enjoyable workspace.
Start by measuring your space, defining your primary workshop activities, and sketching a layout that supports your natural workflow. Invest in quality lighting, adequate storage, and proper ventilation before splurging on the latest tools. Remember that the best workshop grows and adapts with your skills and interests.